


TL;DR: Studio Designer’s Catalog, Design Boards, and AI Rendering tools work together to take a project from sourcing to a client-ready visual in one system. Search or AI-search across 800,000+ SKUs from 330+ brands in Catalog, organize selections by client and room in Design Boards, then generate a photorealistic or stylized rendering of the finished room using the Visualize tool. Every account includes 500 AI credits a month at no extra cost, and upgrading to Pro or Max increases that allowance.
Key Takeaways
- Catalog holds more than 800,000 SKUs across 330+ trade-focused brands, searchable by category, brand, dimension, and color (including a custom color picker and hex code entry).
- AI search in Catalog understands natural-language prompts, including descriptive details like “deep-tufted leather sofa” that may not appear in a product’s title or spec sheet.
- Reverse image search lets you upload a photo of an item and find visually similar products across the Catalog, no text description needed.
- Get Price logs into a vendor’s site directly from Catalog and pulls your firm’s specific trade price, using credentials you enter once per brand.
- Design Boards organize sourced items by client project and room, and support reordering, printing, and bulk-adding items to a project.
- AI Rendering (Visualize) turns a reference photo and a set of Design Board items into a finished room visual, in styles ranging from photorealistic to watercolor, acrylic, or colored pencil.
- Every plan includes 500 AI credits per month, shared at the account level rather than per user. Pro adds 2,500 credits for $20/month; Max offers unlimited credits through the end of 2026 for a $50 add-on.
What Is the Design Boards Workflow in Studio Designer?
Design Boards is Studio Designer’s sourcing and visualization workspace, built to replace the scattered mix of browser tabs, screenshots, and separate tools (SketchUp for one step, Canva or PowerPoint for another) that many design firms use to pull a concept together. The workflow has three stages:
- Source items in Catalog, either by browsing or using AI-powered search.
- Organize those items on a Design Board, grouped by client project and room.
- Visualize the finished room using the AI Rendering tool, then export or print the result for client presentations and proposals.
To get started, open the paint palette icon in the left-hand menu, go to Design Boards, click New Board, select the project and room you’re sourcing for, and save.
How Do You Search and Source Products in Catalog?
Catalog is built around three ways to find products: standard filtering, AI-powered natural-language search, and reverse image search.
Standard filtering and search
- Filter by category and subcategory, specific brand, dimension range (for example, a sofa no more than 78 inches and no less than 74 inches), and color.
- Favorite the brands your firm sources from most often so they’re easier to find on future projects.
- Sort results by brand tier, and open any product to view a large image alongside detailed specs.
- From a product listing, either visit the brand’s website directly or add the item straight to a Design Board.
Color search with a custom picker
Beyond standard color swatches, Catalog includes a slider and color picker for matching a precise shade, or you can paste in a specific hex code to find products that most closely match it.

AI-powered natural-language search
Toggling into AI mode lets you type a descriptive prompt rather than a keyword, such as “a deep-tufted leather sofa in a dark leather.” The AI search understands descriptive context, so it can surface strong matches even when terms like “deep-tufted” or “dark leather” don’t appear in a product’s title, description, or spec sheet.

Reverse image search
If you have a photo of an item you like but no source, uploading that image into the AI search box returns similar products from across Catalog’s brand catalogs, based on shape and style rather than any text description.

Get Price: pulling your firm’s actual trade price
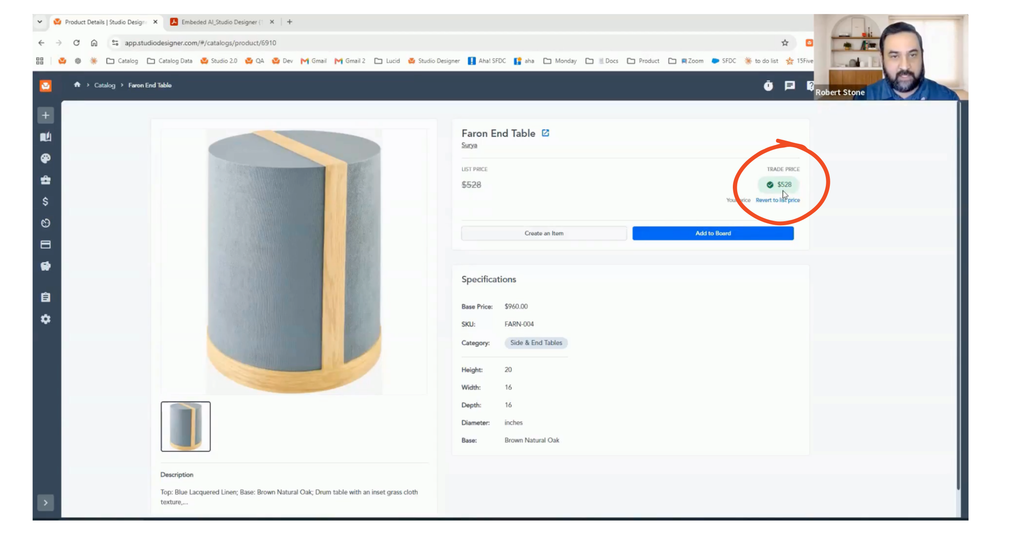
Some listings show a blue price-tag icon. Clicking it triggers an AI agent that logs into that brand’s website using your saved trade credentials and retrieves your firm’s specific price, whether that’s a standard trade discount, wholesale pricing, or stocking-dealer pricing. You only need to enter your login for a given brand once; after that, Catalog reuses it for future price lookups from that vendor.
How Do You Organize Sourced Items with Design Boards?
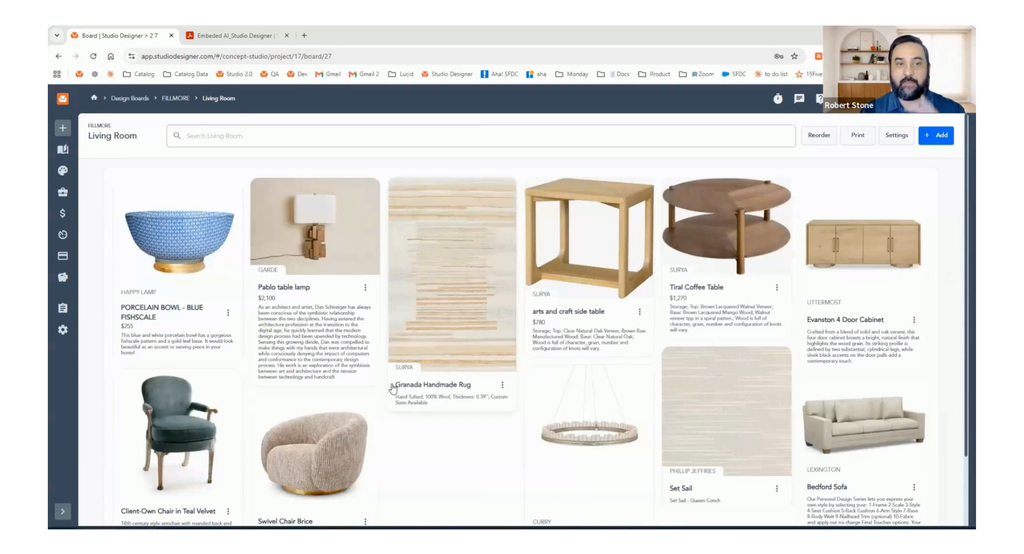
Once items are pulled into a Design Board, several organizing tools are available:
- View and edit product specs, including the option to compare your edited specs against the original manufacturer specs.
- Reorder items (for example, grouping all seating together, then tables and case goods, then rugs and lighting) using the Reorder button, which also controls the order items appear in when printed.
- Print directly from the board in whatever order you’ve arranged.
- Bulk-add items to a project by selecting multiple entries and clicking Create Items, which adds them all to the project at once.
If you can’t find what you need in Catalog, Design Boards supports two additional ways to add items: pasting a vendor or supplier URL (Studio Designer’s AI agent pulls in product data directly from that page), or manually uploading an image with a name and description for client-owned or one-off pieces, like an antique with no online listing.
How Does AI Rendering Work in Studio Designer?
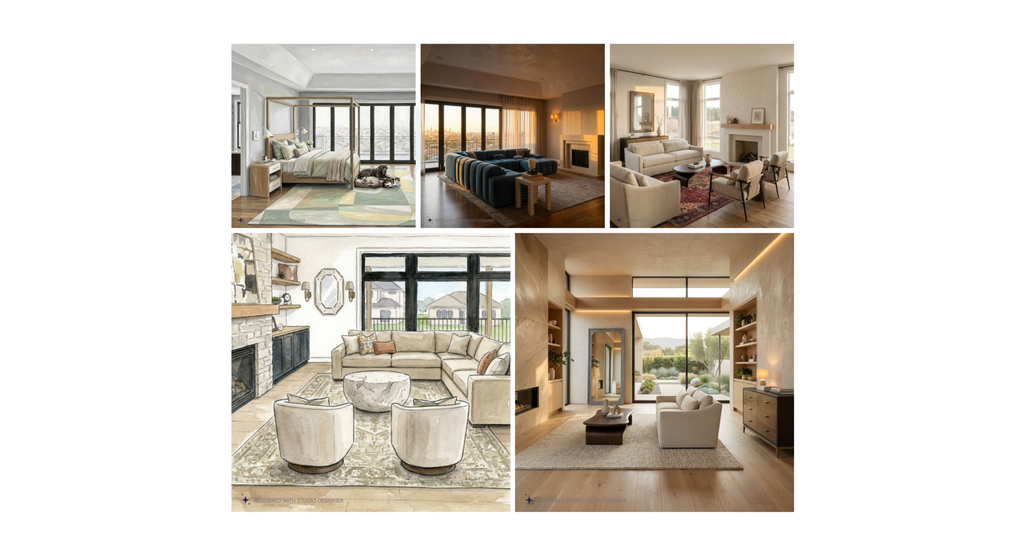
The Visualize tool generates a rendering of a room using a reference image, a set of selected Design Board items, and a written prompt describing placement and style.
Starting from a photo of the actual room
Upload a reference photo of the client’s space (ideally without existing furniture), select the Design Board items you want included, and write a prompt describing the room dimensions and how items should be arranged. Effective prompts specify details like:
- Camera angle to match the reference photo
- Room dimensions
- Furniture placement (for example, sofa against the back wall, coffee table centered on the rug, legs positioned on top of the rug)
- Lighting placement (for example, one fixture centered above the coffee table)
- Wallpaper or wall treatment, and which walls it applies to
- Window treatments, even when the exact fabric hasn’t been chosen yet (for example, “three pairs of floor-to-ceiling panels in a neutral color”)
More specific prompts, paired with the right selection of items, produce stronger results.
Removing furniture from an already-furnished room
Many client rooms already have furniture in them, and a completely empty photo isn’t always available. To generate a blank canvas: upload the furnished reference photo, add a plain white image as the only item on the board (a screenshot of blank white space saved as a JPEG works), and write a prompt instructing the tool to keep the angle, walls, and floors while removing existing furniture and rugs. The output is a furniture-free version of the same room, which can then be downloaded and used as the reference image for a new rendering.
Applying COM fabric to existing furniture shapes
To preview a client’s own fabric (COM) on a specific piece, use a blank white image as the reference, add both the fabric and the furniture piece to the board, and write a prompt specifying the fabric repeat size and the piece’s dimensions. You can also request multiple angles in a single rendering (for example, three-quarter front, three-quarter back, straight-on, and side profile) for use in client proposals.

Choosing a rendering style
Beyond photorealistic output, Visualize supports watercolor, acrylic, and colored-pencil styles. Non-photorealistic styles can be useful when a client tends to get attached to exact measurements: a painterly rendering conveys design intent without implying the precision of an architectural drawing, which can make it easier for clients to stay flexible as a design evolves.
How Many AI Credits Does Each Feature Use?
Every Studio Designer account includes 500 AI credits per month at no additional cost, shared across the account rather than allocated per user. Credit costs vary by feature:
| AI Feature | Credit Cost |
| AI natural-language search | 2 credits |
| Reverse image search | Several credits (higher than text search) |
| Get Price (trade price lookup) | 3 credits |
| AI Rendering (Visualize) | 20 credits |
Because each rendering regenerates the entire image from scratch, including reading the full prompt, every selected item, and the reference image, there’s no reduced-cost option for small tweaks like changing a single fabric. Every rendering run costs the full 20 credits, even minor revisions.
What Do the Studio Designer AI Plans Cost?
| Plan | AI Credits | Price |
| Included with every account | 500 credits/month | No additional cost to your monthly subscription price |
| Pro | 2,500 credits/month | $20/month, account-level |
| Max | Unlimited through end of 2026 | $50/month add-on, account-level |
Pro and Max pricing applies at the account level rather than per seat, so a firm with 25 or more users pays a single $20 or $50 charge rather than a per-user fee. Plans can be upgraded or downgraded as project volume changes month to month.
What AI Features Are Coming Next to Studio Designer?
- Account-wide natural-language search, extending beyond Catalog to the full account.
- An expediting agent to track order status, acknowledgment, invoicing, estimated ship dates, and tracking numbers within the procurement flow.
- Bank reconciliation, time suggest, and bank import features for accounting and time management.
FAQ
Can I change a window or door style in a rendering of a client’s actual room? Yes. You can describe the change directly in your prompt, either when removing existing furniture from a reference photo or when generating the final rendering, for example, replacing metal-frame windows with a different style, or swapping doors for French doors.
How do I create the initial room image for a rendering if I don’t have a client photo? If you have a reference photo of the space, even one that’s still furnished, you can use it as a starting point. Without any reference photo, you can start from a blank white image and prompt the tool with room dimensions and details (window count, adjoining rooms, and similar context) to generate a starting room. For ground-up builds, floor plans and elevations can also be fed in alongside a blank image as a starting reference.
Does tweaking a rendering charge credits again? Yes. Each rendering run costs 20 credits regardless of how small the change is, since the tool regenerates the full image from the prompt, selected items, and reference photo each time rather than editing only the changed element.
Can I use an existing mood board template as a reference image? You can upload a screenshot of an existing mood board layout as a reference image, which may help the tool understand furniture placement, though it isn’t likely to follow exact measurements or positioning instructions precisely. For a fully custom mood board layout, items sourced in Catalog and organized in Design Boards can be dragged directly into PowerPoint, Canva, or a similar tool to rebuild a firm’s established format.
If you are evaluating payroll options or looking to simplify your current process, it may be worth reviewing how an integrated approach would work for your firm.
Schedule a demo or connect with your Studio Designer representative to learn more: https://www.studiodesigner.com/get-a-demo/
We can’t wait to connect.